VPN(Virtual Private Networking): Difference between revisions
No edit summary |
|||
| (13 intermediate revisions by 3 users not shown) | |||
| Line 3: | Line 3: | ||
=== VPN Setups === | === VPN Setups === | ||
We have two typical configuration possibilities: site to site and remote access. Site to site is more suited when persistent connectivity is needed. For instance from RTU to Network Control Center(NCC). Remote access is provided for cases when non persistent access is needed or when persistent tunnel is not needed. For example remote management(configuration changes or etc) from different locations with dynamic IP address. Figure 1 illustrates this general concept. | We have two typical configuration possibilities: site to site and remote access. Site to site is more suited when persistent connectivity is needed. For instance from RTU to Network Control Center(NCC). Remote access is provided for cases when non persistent access is needed or when persistent tunnel is not needed. For example remote management(configuration changes or etc) from different locations with dynamic IP address. Figure 1 illustrates this general concept. | ||
[[ | [[File:vpn.png|629px|thumb|center|Figure 1: General Model for VPN Deploiments]] | ||
=== Site to Site With OpenVPN === | === Site to Site With OpenVPN === | ||
In order to configure site to site VPN with OpenVPN open Common → OpenVPN. From opened dialog box click on Add. “Server address” and “Server port” are the WAN address and UDP port of the server. That means that we support OpenVPN's mode tls-client over UDP. Click on buttons “CA cert”, “Cert” and “Key” in order to select certificates for client. By default routes are pulled from server. This is needed in order the device knows what to send to VPN tunnels and what IP address to use for tunnel interface. “Fragment” 0 means that default setting for OpenVPN is used. | In order to configure site to site VPN with OpenVPN open Common → OpenVPN. From opened dialog box click on Add. “Server address” and “Server port” are the WAN address and UDP port of the server. That means that we support OpenVPN's mode tls-client over UDP. Click on buttons “CA cert”, “Cert” and “Key” in order to select certificates for client. By default routes are pulled from server. This is needed in order the device knows what to send to VPN tunnels and what IP address to use for tunnel interface. “Fragment” 0 means that default setting for OpenVPN is used. | ||
[[ | [[File:OpenVPN-Default.png|342px|thumb|center|Figure 2: Default OpenVPN Client Configuration Dialog]] | ||
Figure 2 shows default configuration dialog box. Note that pink fields are mandatory and that default “Server address”, “Local IP” and “Remote IP ” are probably not suitable for your needs. Figure 3 shows production configuration where WAN IP and port and certificates are selected and configured. | Figure 2 shows default configuration dialog box. Note that pink fields are mandatory and that default “Server address”, “Local IP” and “Remote IP ” are probably not suitable for your needs. Figure 3 shows production configuration where WAN IP and port and certificates are selected and configured. | ||
[[ | [[File:OpenVPN-NonDefault.png|342px|thumb|center|Figure 3: Configuration for interface tun0]] | ||
More info OpenVPN can be found here [http://openvpn.net/index.php/open-source/documentation/howto.html] | |||
=== Site to Site With IPsec === | === Site to Site With IPsec === | ||
In order to configure site to site VPN with IPSec open Common → IPSec and click on Add. From drop down menus select Encryption, Authentication and other parameters for phase 1 and 2 to suit your needs. Parameter Local select which local networks to tunnel over IPSec. “Remote networks” selects “Remote Peers” local networks to tunnel over IPSec. Figure 4 shows default configuration dialog for IPsec and figure 5 setup used in testing. | In order to configure site to site VPN with IPSec open Common → IPSec and click on Add. From drop down menus select Encryption, Authentication and other parameters for phase 1 and 2 to suit your needs. Parameter Local select which local networks to tunnel over IPSec. “Remote networks” selects “Remote Peers” local networks to tunnel over IPSec. Figure 4 shows default configuration dialog for IPsec and figure 5 setup used in testing. | ||
In order to view if tunnel is up issue “setkey -D”. Here is an example output, which shows an open tunnel between 10.0.0.111(Telem-GWM) and 10.0.0.86: | NB! Remote network & subnet has to match the real remote configuration (LAN network?), otherwise PHASE 2 fails. If you see the following error messages, then this may be the case. | ||
<pre> | |||
ERROR: failed to pre-process ph2 packet (side: 1, status: 1) | |||
ERROR: failed to get sainfo. | |||
</pre> | |||
[[File:IPSec-Default.png|395px|thumb|center|Figure 4: Default IPsec Tunnel Configuration Dialog]] | |||
[[File:IPSec-NonDefault.png|420px|thumb|center|Figure 5: IPSec Minimum Configuration]] | |||
In order to view if tunnel is up issue “setkey -D” or use racoonctl. For instance "racoonctl -l show-sa isakmp" for phase 1 and "racoonctl -l show-sa ipsec" for phase 2. Here is an example output form “setkey -D”, which shows an open tunnel between 10.0.0.111(Telem-GWM) and 10.0.0.86: | |||
<pre> | <pre> | ||
root@telem-gwm /home/martem $ setkey -D | root@telem-gwm /home/martem $ setkey -D | ||
| Line 113: | Line 122: | ||
Apr 25 11:22:58 telem-gwm daemon.info racoon: INFO: IPsec-SA established: ESP/Tunnel 10.0.0.111[500]->10.0.0.86[500] spi=20748511(0x13c98df) | Apr 25 11:22:58 telem-gwm daemon.info racoon: INFO: IPsec-SA established: ESP/Tunnel 10.0.0.111[500]->10.0.0.86[500] spi=20748511(0x13c98df) | ||
</pre> | </pre> | ||
More info about racoon, racoonctl and setkey can be found here [http://ipsec-tools.sourceforge.net/] | |||
=== Remote Access with L2TP/IPSec === | === Remote Access with L2TP/IPSec === | ||
In order to configure L2TP/IPSec open Common → L2TP, check “LNS Enable” check box and turn on IPSec protection for L2TP by checking the IPSec check box. | In order to configure L2TP/IPSec open Common → L2TP, check “LNS Enable” check box and turn on IPSec protection for L2TP by checking the IPSec check box. | ||
[[ | [[File:L2TP-IPSec-Default.png|497px|thumb|center|Figure 6: L2TP/IPSec Default Settings]] | ||
[[ | [[File:L2TP-IPSec-NonDefault.png|494px|thumb|center|Figure 7: Minimal L2TP/IPSec Settings]] | ||
Figure 6 shows default settings and figure 7 minimal settings. Note the IP column and selection under Users. This is needed in order to limit access with firewall. If IP is not selected then device assigns an IP from pool that starts with “Remote Start IP” and ends with “Remote Stop IP”. As this assignment is dynamic it is not possible to configure firewall by username. This means that users without assigned IP cannot access the TELEM-GWM but can probably access other resources on the local LAN. Needless to say that systems on production networks should not have an account with “Password” pass and “IPSec pre-shared key” pass. | Figure 6 shows default settings and figure 7 minimal settings. Note the IP column and selection under Users. This is needed in order to limit access with firewall. If IP is not selected then device assigns an IP from pool that starts with “Remote Start IP” and ends with “Remote Stop IP”. As this assignment is dynamic it is not possible to configure firewall by username. This means that users without assigned IP cannot access the TELEM-GWM but can probably access other resources on the local LAN. Needless to say that systems on production networks should not have an account with “Password” pass and “IPSec pre-shared key” pass. | ||
=== Set up Remote Access with L2TP/IPSec in Windows. === | |||
Got to "Control Panel" -> "Network and Internet" -> "Network and Sharing Center" and open "Set up a new connection or network" under "Change your networking settings" | |||
[[File:Nasc.jpg|629px|thumb|center|]] | |||
In the "Set Up a Connection or Netwrok" window choose "Connect to a workplace" -> "Use my Interent connection (VPN)" | |||
Type GWM's exteranl IP address in the "Internet address" field and click Next | |||
Type in your L2TP user and password and proceed | |||
'''Windows will try to establish a connection rigth away. Click "Skip" for now''' | |||
Go back to "Network and Sharing Center" and open "Change Adapter Settings" | |||
[[File:Nasc_adapter.jpg|629px|thumb|center|]] | |||
Click on VPN connection with the right mouse button and choose "Properties" in the drop-down menu | |||
[[File:Nasc_adapter_VPN.jpg|629px|thumb|center|]] | |||
In the upcoming menu open the "Security" tab and set the "Type of VPN:" to "Layer 2 Tunneling Protocol with IPsec(L2TP/IPSec)" | |||
[[File:VPN_sectab.jpg|300px|thumb|center|]] | |||
Open "Advanced settings" in the same tab. Pick "Use preshared key for authentication" and enter the IPSec pre-shared key in the "Key:" field | |||
[[File:WIN_VPN_secadv.jpg|300px|thumb|center|]] | |||
Click "OK" to save changes and close "Advanced Settings" window. Click "OK" to close the current "VPN Conection Properties" window. | |||
Now the newly created VPN point should be visible in "Network Connections" window | |||
[[File:Network_connections.jpg|thumb|center|]] | |||
=== Known Working Client or Server Software === | === Known Working Client or Server Software === | ||
| Line 128: | Line 174: | ||
IPsec: | IPsec: | ||
* Ubuntu 12.04 LTS with ipsec-tools, with direct configuration not using any of the GUI software. Hint: use gws.exe to get racoon and setkey configurations. | * Ubuntu 12.04 LTS with ipsec-tools, with direct configuration not using any of the GUI software. Hint: use gws.exe to get racoon and setkey configurations. | ||
* | * pfSense 2.0.3-RELEASE [http://www.pfsense.org/] | ||
* Cisco SR520-FE with IOS 12.4(20)T6. A good reference for racoon with third party software can be found here: [http://www.admin-magazine.com/Articles/Cross-Vendor-IPsec] | |||
<br /> | <br /> | ||
L2TP/IPSec: | L2TP/IPSec: | ||
Latest revision as of 10:06, 31 May 2019
This page is not a tutorial on OpenVPN or on IPsec. It gives general overview of different setups and shows options found from configuration software gws.exe. It is assumed that reader is familiar with TELEM-GWM configuration software gws.exe and understands how to secure the device. Securing the device is described in Basic Security.
VPN Setups
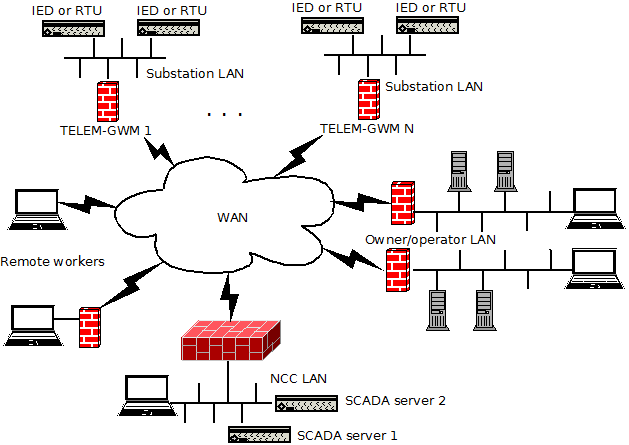
We have two typical configuration possibilities: site to site and remote access. Site to site is more suited when persistent connectivity is needed. For instance from RTU to Network Control Center(NCC). Remote access is provided for cases when non persistent access is needed or when persistent tunnel is not needed. For example remote management(configuration changes or etc) from different locations with dynamic IP address. Figure 1 illustrates this general concept.
Site to Site With OpenVPN
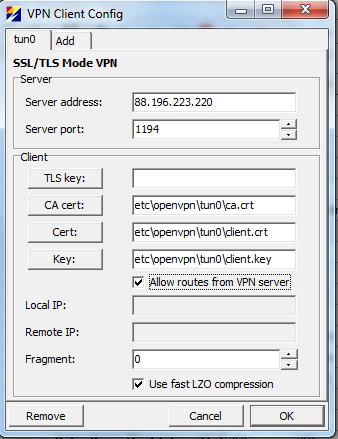
In order to configure site to site VPN with OpenVPN open Common → OpenVPN. From opened dialog box click on Add. “Server address” and “Server port” are the WAN address and UDP port of the server. That means that we support OpenVPN's mode tls-client over UDP. Click on buttons “CA cert”, “Cert” and “Key” in order to select certificates for client. By default routes are pulled from server. This is needed in order the device knows what to send to VPN tunnels and what IP address to use for tunnel interface. “Fragment” 0 means that default setting for OpenVPN is used.
Figure 2 shows default configuration dialog box. Note that pink fields are mandatory and that default “Server address”, “Local IP” and “Remote IP ” are probably not suitable for your needs. Figure 3 shows production configuration where WAN IP and port and certificates are selected and configured.
More info OpenVPN can be found here [1]
Site to Site With IPsec
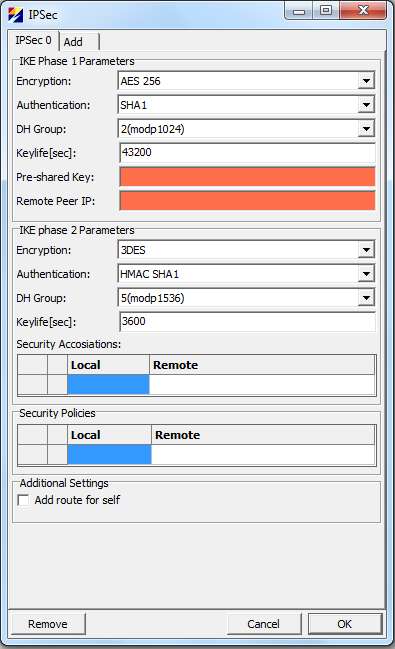
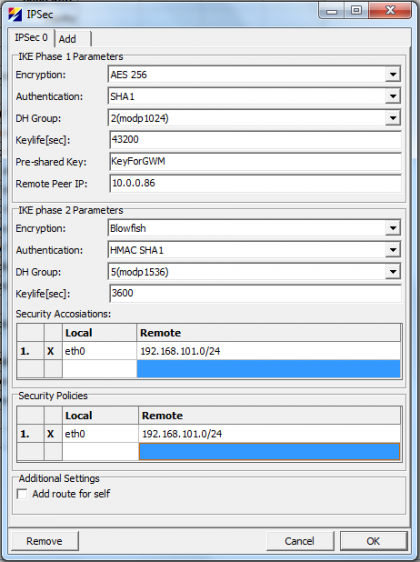
In order to configure site to site VPN with IPSec open Common → IPSec and click on Add. From drop down menus select Encryption, Authentication and other parameters for phase 1 and 2 to suit your needs. Parameter Local select which local networks to tunnel over IPSec. “Remote networks” selects “Remote Peers” local networks to tunnel over IPSec. Figure 4 shows default configuration dialog for IPsec and figure 5 setup used in testing.
NB! Remote network & subnet has to match the real remote configuration (LAN network?), otherwise PHASE 2 fails. If you see the following error messages, then this may be the case.
ERROR: failed to pre-process ph2 packet (side: 1, status: 1)
ERROR: failed to get sainfo.
In order to view if tunnel is up issue “setkey -D” or use racoonctl. For instance "racoonctl -l show-sa isakmp" for phase 1 and "racoonctl -l show-sa ipsec" for phase 2. Here is an example output form “setkey -D”, which shows an open tunnel between 10.0.0.111(Telem-GWM) and 10.0.0.86:
root@telem-gwm /home/martem $ setkey -D
10.0.0.111 10.0.0.86
        esp mode=tunnel spi=30607459(0x01d30863) reqid=16384(0x00004000)
        E: blowfish-cbc  72dce7f9 a84cb8bf 8a8d2e68 53779039 781eb0c9
        A: hmac-sha1  bc848381 1b957927 615d9700 689dc79e a17ca699
        seq=0x00000000 replay=4 flags=0x00000000 state=dying
        created: Apr 25 10:16:40 2013   current: Apr 25 11:14:45 2013
        diff: 3485(s)   hard: 3600(s)   soft: 2880(s)
        last:                           hard: 0(s)      soft: 0(s)
        current: 0(bytes)       hard: 0(bytes)  soft: 0(bytes)
        allocated: 0    hard: 0 soft: 0
        sadb_seq=1 pid=17474 refcnt=0
10.0.0.86 10.0.0.111
        esp mode=tunnel spi=137118544(0x082c4350) reqid=16385(0x00004001)
        E: blowfish-cbc  c322fad3 5d74cfb9 929123fc beafbd64 0975acd6
        A: hmac-sha1  2d8bb180 68e67033 be2f2e52 608c4a45 939bde84
        seq=0x00000000 replay=4 flags=0x00000000 state=dying
        created: Apr 25 10:16:40 2013   current: Apr 25 11:14:45 2013
        diff: 3485(s)   hard: 3600(s)   soft: 2880(s)
        last:                           hard: 0(s)      soft: 0(s)
        current: 0(bytes)       hard: 0(bytes)  soft: 0(bytes)
        allocated: 0    hard: 0 soft: 0
        sadb_seq=0 pid=17474 refcnt=0
root@telem-gwm /home/martem $
Here is the syslog output showing racoon setting this tunnel up:
root@telem-gwm /home/martem $ cat /var/log/messages | grep racoon | more
Apr 25 09:08:55 telem-gwm user.notice root: IPSec: racoon needs to be started
Apr 25 09:08:55 telem-gwm user.notice root: IPSec: racoon error, restarting
Apr 25 09:08:55 telem-gwm daemon.info racoon: INFO: @(#)ipsec-tools 0.8.0 (http://ipsec-tools.sourceforge.net)
Apr 25 09:08:55 telem-gwm daemon.info racoon: INFO: @(#)This product linked OpenSSL 1.0.1e 11 Feb 2013 (http://www.openssl.org/)
Apr 25 09:08:55 telem-gwm daemon.info racoon: INFO: Reading configuration from "/etc/racoon/racoon.conf"
Apr 25 09:08:57 telem-gwm daemon.info racoon: INFO: 192.168.2.111[500] used for NAT-T
Apr 25 09:08:57 telem-gwm daemon.info racoon: INFO: 192.168.2.111[500] used as isakmp port (fd=8)
Apr 25 09:08:57 telem-gwm daemon.info racoon: INFO: 192.168.2.111[4500] used for NAT-T
Apr 25 09:08:57 telem-gwm daemon.info racoon: INFO: 192.168.2.111[4500] used as isakmp port (fd=9)
Apr 25 09:08:57 telem-gwm daemon.info racoon: INFO: 10.0.0.111[500] used for NAT-T
Apr 25 09:08:57 telem-gwm daemon.info racoon: INFO: 10.0.0.111[500] used as isakmp port (fd=10)
Apr 25 09:08:57 telem-gwm daemon.info racoon: INFO: 10.0.0.111[4500] used for NAT-T
Apr 25 09:08:57 telem-gwm daemon.info racoon: INFO: 10.0.0.111[4500] used as isakmp port (fd=11)
Apr 25 09:08:57 telem-gwm daemon.info racoon: INFO: 192.168.1.111[500] used for NAT-T
Apr 25 09:08:57 telem-gwm daemon.info racoon: INFO: 192.168.1.111[500] used as isakmp port (fd=12)
Apr 25 09:08:57 telem-gwm daemon.info racoon: INFO: 192.168.1.111[4500] used for NAT-T
Apr 25 09:08:57 telem-gwm daemon.info racoon: INFO: 192.168.1.111[4500] used as isakmp port (fd=13)
Apr 25 09:08:57 telem-gwm daemon.info racoon: INFO: 127.0.0.1[500] used for NAT-T
Apr 25 09:08:57 telem-gwm daemon.info racoon: INFO: 127.0.0.1[500] used as isakmp port (fd=14)
Apr 25 09:08:57 telem-gwm daemon.info racoon: INFO: 127.0.0.1[4500] used for NAT-T
Apr 25 09:08:57 telem-gwm daemon.info racoon: INFO: 127.0.0.1[4500] used as isakmp port (fd=15)
Apr 25 09:08:57 telem-gwm daemon.info racoon: INFO: 127.0.0.0[500] used for NAT-T
Apr 25 09:08:57 telem-gwm daemon.info racoon: INFO: 127.0.0.0[500] used as isakmp port (fd=16)
Apr 25 09:08:57 telem-gwm daemon.info racoon: INFO: 127.0.0.0[4500] used for NAT-T
Apr 25 09:08:57 telem-gwm daemon.info racoon: INFO: 127.0.0.0[4500] used as isakmp port (fd=17)
Apr 25 09:08:57 telem-gwm daemon.info racoon: INFO: fe80::20d:15ff:fe00:af98%eth0[500] used as isakmp port (fd=18)
Apr 25 09:08:57 telem-gwm daemon.info racoon: INFO: fe80::20d:15ff:fe00:af98%eth0[4500] used as isakmp port (fd=19)
Apr 25 09:08:57 telem-gwm daemon.info racoon: INFO: fe80::250:b6ff:fe0d:66e1%eth1[500] used as isakmp port (fd=20)
Apr 25 09:08:57 telem-gwm daemon.info racoon: INFO: fe80::250:b6ff:fe0d:66e1%eth1[4500] used as isakmp port (fd=21)
Apr 25 09:08:57 telem-gwm daemon.info racoon: INFO: fe80::250:b6ff:fe0d:66e6%eth2[500] used as isakmp port (fd=22)
Apr 25 09:08:57 telem-gwm daemon.info racoon: INFO: fe80::250:b6ff:fe0d:66e6%eth2[4500] used as isakmp port (fd=23)
Apr 25 09:28:38 telem-gwm daemon.info racoon: INFO: respond new phase 1 negotiation: 10.0.0.111[500]<=>10.0.0.86[500]
Apr 25 09:28:38 telem-gwm daemon.info racoon: INFO: begin Identity Protection mode.
Apr 25 09:28:38 telem-gwm daemon.info racoon: INFO: received Vendor ID: RFC 3947
Apr 25 09:28:38 telem-gwm daemon.info racoon: INFO: received Vendor ID: draft-ietf-ipsec-nat-t-ike-02
Apr 25 09:28:38 telem-gwm daemon.info racoon: INFO: received Vendor ID: draft-ietf-ipsec-nat-t-ike-02
Apr 25 09:28:38 telem-gwm daemon.info racoon: INFO: received Vendor ID: draft-ietf-ipsec-nat-t-ike-00
Apr 25 09:28:38 telem-gwm daemon.info racoon: INFO: received broken Microsoft ID: FRAGMENTATION
Apr 25 09:28:38 telem-gwm daemon.info racoon: INFO: received Vendor ID: DPD
Apr 25 09:28:38 telem-gwm daemon.info racoon: [10.0.0.86] INFO: Selected NAT-T version: RFC 3947
Apr 25 09:28:38 telem-gwm daemon.info racoon: [10.0.0.111] INFO: Hashing 10.0.0.111[500] with algo #2
Apr 25 09:28:38 telem-gwm daemon.info racoon: INFO: NAT-D payload #0 verified
Apr 25 09:28:38 telem-gwm daemon.info racoon: [10.0.0.86] INFO: Hashing 10.0.0.86[500] with algo #2
Apr 25 09:28:38 telem-gwm daemon.info racoon: INFO: NAT-D payload #1 verified
Apr 25 09:28:38 telem-gwm daemon.info racoon: INFO: NAT not detected
Apr 25 09:28:38 telem-gwm daemon.info racoon: [10.0.0.86] INFO: Hashing 10.0.0.86[500] with algo #2
Apr 25 09:28:38 telem-gwm daemon.info racoon: [10.0.0.111] INFO: Hashing 10.0.0.111[500] with algo #2
Apr 25 09:28:38 telem-gwm daemon.info racoon: INFO: Adding remote and local NAT-D payloads.
Apr 25 09:28:38 telem-gwm daemon.info racoon: INFO: ISAKMP-SA established 10.0.0.111[500]-10.0.0.86[500] spi:842249519def9f59:ff13cdb628283bc3
Apr 25 09:28:38 telem-gwm daemon.info racoon: [10.0.0.86] INFO: received INITIAL-CONTACT
Apr 25 09:28:39 telem-gwm daemon.info racoon: INFO: respond new phase 2 negotiation: 10.0.0.111[500]<=>10.0.0.86[500]
Apr 25 09:28:39 telem-gwm daemon.info racoon: INFO: IPsec-SA established: ESP/Tunnel 10.0.0.111[500]->10.0.0.86[500] spi=179131318(0xaad53b6)
Apr 25 09:28:39 telem-gwm daemon.info racoon: INFO: IPsec-SA established: ESP/Tunnel 10.0.0.111[500]->10.0.0.86[500] spi=193541716(0xb893654)
Apr 25 10:16:39 telem-gwm daemon.info racoon: INFO: IPsec-SA expired: ESP/Tunnel 10.0.0.86[500]->10.0.0.111[500] spi=179131318(0xaad53b6)
Apr 25 10:16:39 telem-gwm daemon.info racoon: INFO: IPsec-SA expired: ESP/Tunnel 10.0.0.111[500]->10.0.0.86[500] spi=193541716(0xb893654)
For troubleshooting use command “tail -f /var/log/messages | grep racoon”. This shows real time racoon messages. Here is the example output:
root@telem-gwm /home/martem $ tail -f  /var/log/messages | grep racoon
Apr 25 11:04:40 telem-gwm daemon.info racoon: INFO: IPsec-SA expired: ESP/Tunnel 10.0.0.111[500]->10.0.0.86[500] spi=30607459(0x1d30863)
Apr 25 11:16:40 telem-gwm daemon.info racoon: INFO: IPsec-SA expired: ESP/Tunnel 10.0.0.86[500]->10.0.0.111[500] spi=137118544(0x82c4350)
Apr 25 11:16:40 telem-gwm daemon.info racoon: INFO: IPsec-SA expired: ESP/Tunnel 10.0.0.111[500]->10.0.0.86[500] spi=30607459(0x1d30863)
Apr 25 11:22:58 telem-gwm daemon.info racoon: INFO: respond new phase 2 negotiation: 10.0.0.111[500]<=>10.0.0.86[500]
Apr 25 11:22:58 telem-gwm daemon.info racoon: INFO: IPsec-SA established: ESP/Tunnel 10.0.0.111[500]->10.0.0.86[500] spi=165979047(0x9e4a3a7)
Apr 25 11:22:58 telem-gwm daemon.info racoon: INFO: IPsec-SA established: ESP/Tunnel 10.0.0.111[500]->10.0.0.86[500] spi=20748511(0x13c98df)
More info about racoon, racoonctl and setkey can be found here [2]
Remote Access with L2TP/IPSec
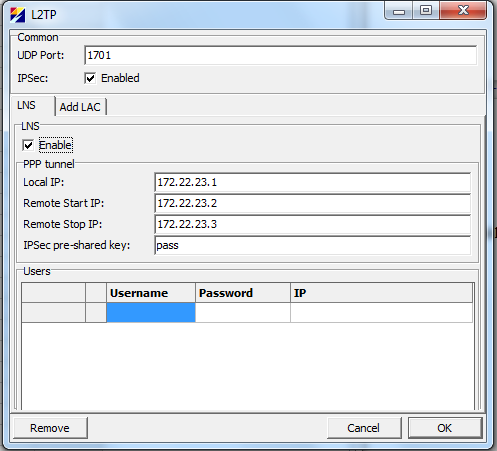
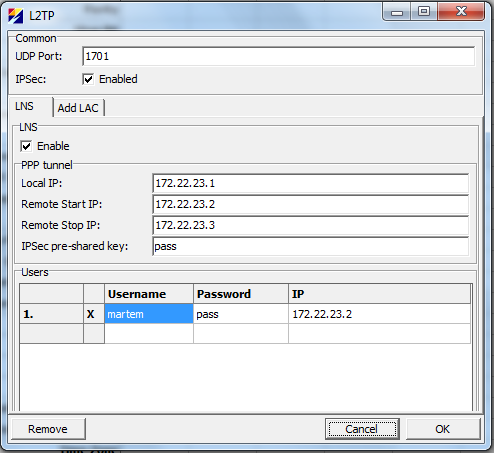
In order to configure L2TP/IPSec open Common → L2TP, check “LNS Enable” check box and turn on IPSec protection for L2TP by checking the IPSec check box.
Figure 6 shows default settings and figure 7 minimal settings. Note the IP column and selection under Users. This is needed in order to limit access with firewall. If IP is not selected then device assigns an IP from pool that starts with “Remote Start IP” and ends with “Remote Stop IP”. As this assignment is dynamic it is not possible to configure firewall by username. This means that users without assigned IP cannot access the TELEM-GWM but can probably access other resources on the local LAN. Needless to say that systems on production networks should not have an account with “Password” pass and “IPSec pre-shared key” pass.
Set up Remote Access with L2TP/IPSec in Windows.
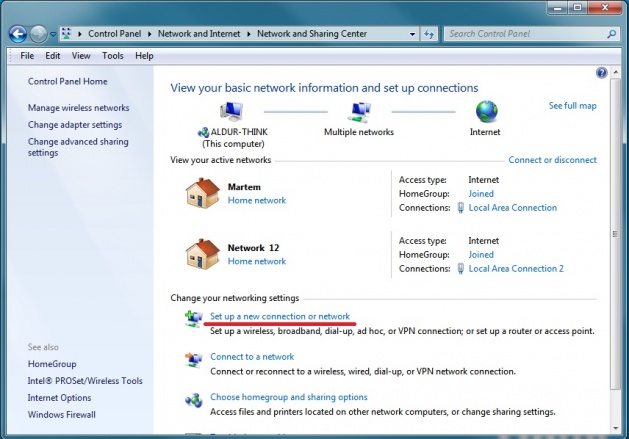
Got to "Control Panel" -> "Network and Internet" -> "Network and Sharing Center" and open "Set up a new connection or network" under "Change your networking settings"
In the "Set Up a Connection or Netwrok" window choose "Connect to a workplace" -> "Use my Interent connection (VPN)"
Type GWM's exteranl IP address in the "Internet address" field and click Next
Type in your L2TP user and password and proceed
Windows will try to establish a connection rigth away. Click "Skip" for now
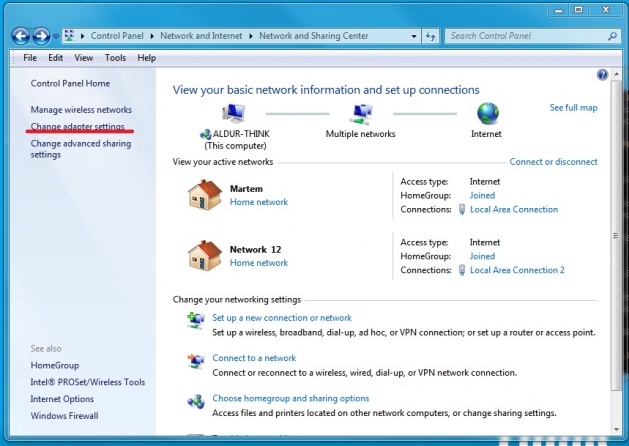
Go back to "Network and Sharing Center" and open "Change Adapter Settings"
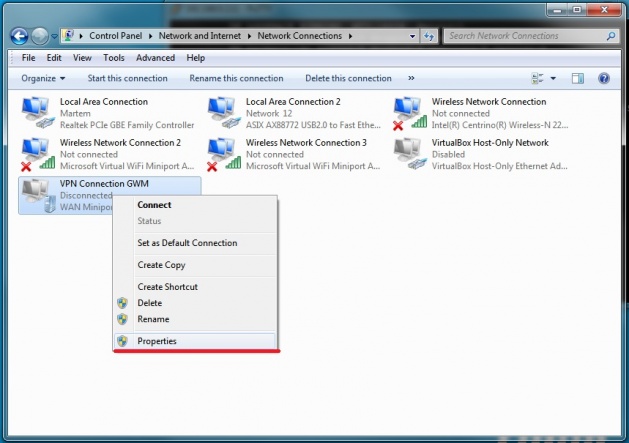
Click on VPN connection with the right mouse button and choose "Properties" in the drop-down menu
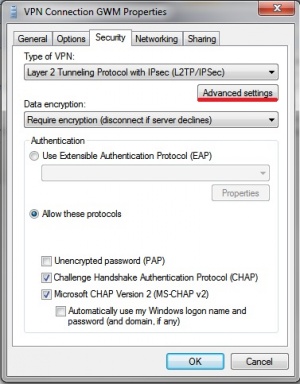
In the upcoming menu open the "Security" tab and set the "Type of VPN:" to "Layer 2 Tunneling Protocol with IPsec(L2TP/IPSec)"
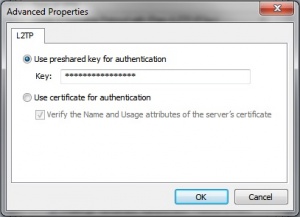
Open "Advanced settings" in the same tab. Pick "Use preshared key for authentication" and enter the IPSec pre-shared key in the "Key:" field
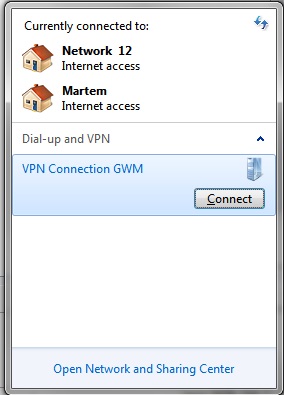
Click "OK" to save changes and close "Advanced Settings" window. Click "OK" to close the current "VPN Conection Properties" window. Now the newly created VPN point should be visible in "Network Connections" window
Known Working Client or Server Software
This is the list of know third party software that is compatible with TELEM-GWM.
OpenVPN:
- pfSense 2.0.1-RELEASE [3]
IPsec:
- Ubuntu 12.04 LTS with ipsec-tools, with direct configuration not using any of the GUI software. Hint: use gws.exe to get racoon and setkey configurations.
- pfSense 2.0.3-RELEASE [4]
- Cisco SR520-FE with IOS 12.4(20)T6. A good reference for racoon with third party software can be found here: [5]
L2TP/IPSec:
- Windows 7
- Mac OS 10.4
- Android 4.1.2 on Nexus 7(Asus tablet), Android 4.0.3 on HTC phone
- Ubuntu 12.04 LTS with ipsec-tools and xl2tpd with direct configuration not using any of the GUI software. Hint: use gws.exe to get racoon, setkey and xl2tpd configurations.
Caveats
Here is a list of some of the known caveats with different VPN setups.
- As OpenVPN uses certificates it is essential that device has correct time. It means that at least NTP client needs to be configured for device that uses OpenVPN. This can be done under Common → Time Settings.
- IPSec is probably only usable with fixed IP addresses. If TELEM-GWM has dynamic IP use OpenVPN or L2TP.
- L2TP works only with one LAC(client) behind network address translation device.
- LNS accounts with fixed IP for LAC are usable only by one instance. If two sessions are established all traffic is sent to only one session.
